I've been using Patons Classic Merino Wool in Winter White for dyeing. It was easy to find at my local chain store (JoAnn's). It's not superwash wool, though, so I'm currently waiting for an order of KnitPicks Superwash bare wool yarn. I don't like to give gifts that aren't washable, especially for people who have kids or for projects that are likely to get dirty, like my mug-huggers.
Other important tools in the process include:
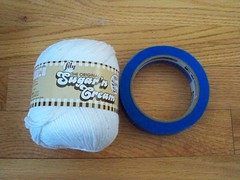
White cotton yarn and blue painter's tape. Cotton yarn won't take up the dye, and because it's white, it won't have any of its own color to bleed on the wool. I like the painter's tape because it does a nice job holding the yarn when I need it in place, but it also doesn't hurt the yarn or the surface it's taped to.
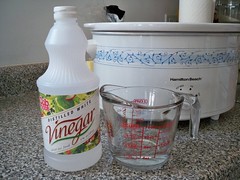
A crock pot and white vinegar. This process uses hot water to fix the dye, and the crock pot works perfectly for that. The dyes need an acid to help the yarn "accept" the dye, which is what the vinegar is for.
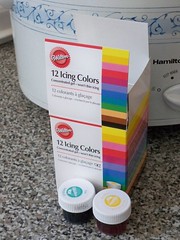
Wilton's icing dyes. This process is completely non-toxic, so you don't have to feel weird about using your kitchen tools. Using food dyes is safe to have the kids work with you, but it only takes on animal fibers, which is why the cotton doesn't take the dye. No plant or synthetic fibers work in this process, though what I've read tells me that the process works if the yarn is at least 75% animal fiber. I cannot attest to this. The icing dyes are nice because they come in a variety of colors, but consider also using Kool-Aid (the add-sugar kind, not the kind that's already sweetened) or the classic food coloring.
The process:
A regular ol' skein of yarn is too thick to use for dyeing. The dye will never reach the inner layers of yarn. It could be an interesting experiment in color to try dyeing a skein, but it's not what I've been looking for.
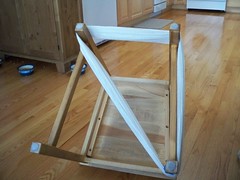
I start by taking a skein and winding it into a loop that isn't nearly as thick. I like the legs of a kitchen chair for this. I start by taping the end of the yarn to the kitchen chair with the blue tape so that I'll be able to find that end later.
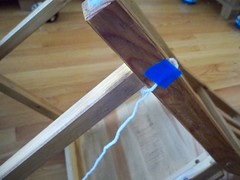
I've done this process with the yarn wrapped around 2, 3 or all 4 legs of the chair. That affects how long of a section of dye you'll get on the yarn--the longer the loop you wind, the longer the stretch of dye on the yarn, in theory.

Once I'm done winding the yarn, I tape the other end down, too. There are tools out there that can help with this winding, but I don't mind doing it myself in front of the tv.
We're at the point now where the cotton yarn comes in. You don't want all that hard work of winding the yarn to be for naught if it just becomes a big ball of mess once you take it off the chair. I use the cotton yarn to make loose ties to hold the yarn together.
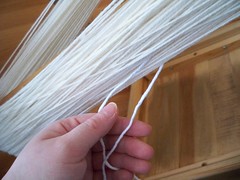
Loosely wind through the yarn for more stability.

I put the ties anywhere form 6 to 10 inches (probably 15-25 cm) apart.
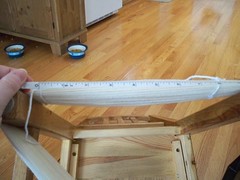
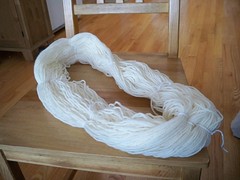
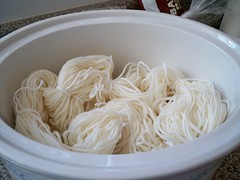
Make sure that the ends are tucked or tied in, removing the blue tape. Then, you can take the yarn off the chair (or whatever you use to wind it). Ta da! Big loop of yarn!
Now, the yarn needs to pre-soak with water and vinegar. To save space, I sometimes do this in my crock pot.
Make sure to put in enough water to cover it. Temperature of the water doesn't matter at this point. I usually hold the yarn down under the water to free an air bubbles. Next, pour in the vinegar. I use about half a cup, but I don't measure it. It doesn't have to be exact. By pre-soaking in my crock pot, I've also got the water and vinegar ready for when I do the dyeing (you need vinegar at that stage, too, and enough water to cover the yarn).
In a rush, I use the pre-heating time of the crock pot as the pre-soaking time as well. This may be the only time the temperature of the water matters. Obviously, using hot water will get the water hot enough for the dyeing sooner than using cold water would.
For the dyeing, you want the water to be HOT, but you don't necessarily want it boiling. Unless my crock pot has been going for awhile, my High setting is great. If the water starts to boil, I turn the crock pot down to Low, which is still hot enough to set the dye.
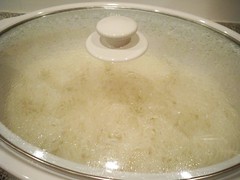
This is a "hot pour" method for a reason: you don't want to pour cold water into the crock pot to change the temperature in there. If the water's hot, you want to keep it hot. That in mind, I don't mix the dyes until the water in the crock pot is hot enough.
The Wilton dyes are concentrated gels, which need to be fully dissolved in boiling water. Our kitchen tap gets REALLY hot, so I often use that water (which is VERY steamy) instead of putting a pot of water on to boil. A tea kettle would be great for this.
There's no exact science for how much water to use with how much dye. Here's what you need to keep in mind:
- Less water will mean less dye of that color in general. The dye might not completely saturate, then, leaving some white or light spots.
- Less dye means a lighter color of dye. This is a way to control the intensity of the color. It's also a great time for mixing colors to get what you want.
- Fewer colors means you need more dye. You probably don't want to use more than 3 dyes because of the mixing of the colors at the edges. if you're using only 1 or 2 colors, you'll need more water and dye.
For my dyes, I use anywhere from 1/2 cup of water to 2 cups of water For the dyes, I use anywhere from a tiny bit to 1/4 tsp. I'd say that my most common mix is 1 1/2 cups water with 1/8 tsp dye.
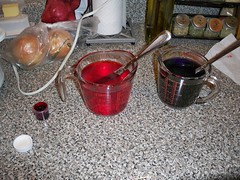
It can be difficult to get the gel to completely dissolve. That's why the water needs to be HOT. I also find that it helps me to spread the gel out, rather than keeping it in a lump. I do that by spreading it on the inside of the glass I'll be mixing it in, being sure to stir well where I spread the dye.
Now, you're ready to go.
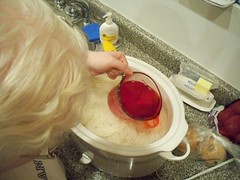
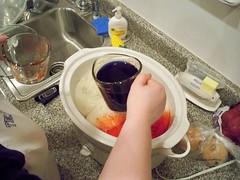
It will look something like this:
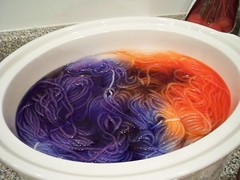
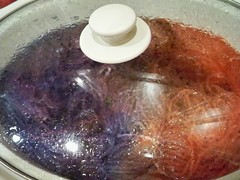
Put the lid on, and let it go. It will need about an hour.
So, how do you know when it's done? The yarn will have absorbed the dye, leaving clear water. Seriously. It'll be clear.

Turn off the crock pot, and let it cool.
Once the yarn has cooled, you'll need to rinse out any excess dye. If you have washable (superwash) wool, you can do this in your washer. It's just fine to rinse it out at the sink, though. Do NOT run wool through a rinse cycle in the washer if it's not superwash. It will felt. Regardless of rinsing, you can spin it in your washer on a low spin cycle to free the yarn of some of its moisture. After that, hang it up.
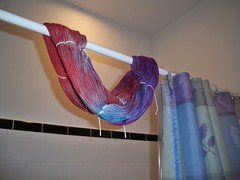
When it's DRY, you can do with it what you will.

If the loop tangled or if I'd like to show the variety in the colors, I may re-wind the yarn on a chair. In this example, I wound it on 3 legs. I would use different number of chair legs if I were to re-wind it (4 in the case of this yarn. I then twist it into a cute little thing of yarn.

I should point out that you will see blue in that picture, even though I didn't use blue dye. The purple dye I used was "violet," and that dye can separate. I don't know why, but some of the blue will separate out of it. It creates an interesting look, though, so I don't mind. This is one thing you have to learn through trial and error--that the dye will do as it pleases.
14 comments:
Can I just say that this is totally cool? It is totally cool!
I mentioned your crockpot dyeing method on my blog todat. I agree, totally cool!!
Terrye
http://knitting.craftgossip.com
Thank you so much for taking the time to create this tutorial! I will definitely try this out the next time I dye. :)
Can't wait to try. Thanks for sharing.
Love the tute - I really like the idea of being able to use my crock pot. Thanks!
wow...that looks nice...thank you for sharing the process
These instructions sound so easy! I've been wanting to try dyeing for a while now.
I mentioned your tutorial on my blog, too!
that is fantastic! Such crafty synergy, as I am looking into dying wool at the minute! I love it when a plan comes together.
The yarn in the crockpot looks like spaghetti noodles. Is it wrong that this post made me hungry for technicolor spaghetti?
I bow to your yarn-dyeing coolness.
I am far too chicken.
Thank you for the tutorial - it's right up my alley ;-)
But what I really, really want to thank you for is decently cropped and sized pictures. While I like your shower curtain (have one like that myself, in fact), I don't need to see the entire bathroom decor as dressing for the yarn hanging to dry.
The clarity and conciseness of your tutorial has made me smile today!!
Tracy in SW WA
FiberBabble
Thanks for the GREAT tutorial! I'm trying my hand at dyeing today and will mention your tutorial on my Fiber 'Tudes Radio Show on Monday afternoon! :)
Very, very cool! I will definitely try this. Thanks for the tutorial!
PS: I'm in Chicago, too. Nice to see another knitting blogger from the Big Windy.
I am a horrible person! I just re-read your profile and see you crochet, not knit...I read that the first time, too, but...Oy.
I love your blog. SOme stuff makes me laugh out loud (like the Bacon Lube. OMG!) Ok, off to read more!
Post a Comment